What is Multi-select list control in Pega?
Multi-Select list control is added to user form so the users can select multiple values from the drop-down. These lists save time and ensure accuracy by supplying a list of valid values for an input field.
Sources for a Multi-Select list control:
- Data page.
- Clipboard page.
- Report definition.
How to configure multi-select in Pega?
Pega has provided OOTB control to configure the Multi-select list for a dropdown. pxMultiSelect is the OOTB control.
We need to have a PageList or Page group property to have the values selected from the drop-down.
We need to provide the source to the Multi-select list control so that control will display the results in a drop-down where users can select one after another.
Adding and configuring a multi-select list control.
Scenario: In a Service Request application, the user wants to raise a Service Request for multiple issues at a time by selecting them in a "Request type" dropdown.
We can achieve this by adding Multi-select list control in section and providing a source to the control.
Define a source for the Multi-select list control:
At runtime, below is the screenshot, where the user can select multiple values from the drop-down. Users can click on the "X" icon on each oval to deselect it.
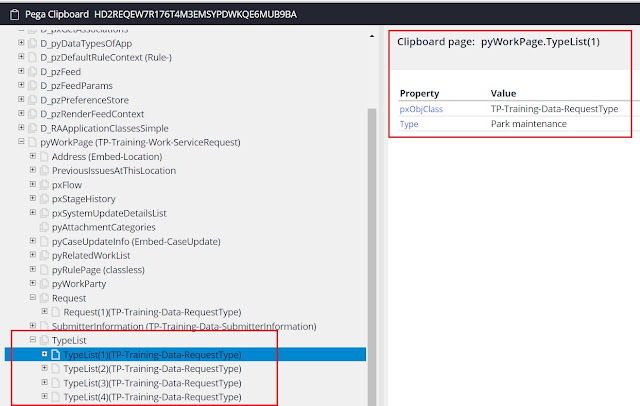
See below clipboard structure for multi-select control, whatever is selected from the drop-down will be added into a Page list property.
Search results configuration:
We will see how to configure search results, from the below screenshot we have 3 options.
1.Show value.
2. Set value.
3. Use for search.
1. Show value:
From the below screenshot First row (Type) is mandatory. However, Description and Department fields are optional and we can add more properties from the source.
A show check box is selected for Description, not for Department.
At runtime, the user can not see the Department when clicking on the drop-down or searching the options, and the user can only see the Issue Type and Issue Description as shown below.
2. Set value.
Whatever we select from the drop-down, those values will be set onto the clipboard PageList property.
From the below screenshot, the Set value check box is selected for the Description field and has given Property. Whenever you select the "Set value" checkbox, need to provide the corresponding property in the Property field as it is mandatory.
3. Use for search.
To search the options from the list. We need to select the check box for the properties where we can search the options from the list at runtime. From the below screenshot; the "Search" check box is selected for Type and Description, which means we can only search the options with type or description and we can not search the options with the department name.

Some questions or issues while implementing Multi-select list control:
1. Drop-down is allowing to select one option at a time, need to click on the drop-down arrow multiple times to select multiple values.
We can observe this issue when we configure a multi-select list control, where the user has to click on the drop-down arrow multiple times to select multiple values. Drop-down is not sticky until we select desired values.
Solution: We need to remove the on-click action from the actions tab (if have any) so that drop-down will not be dis-appeared for each selection.
2. Restrict free form text entry.
With the Multi-select list control, user can type own text and make it as an option even though that option is not there in the drop-down (source) like below:
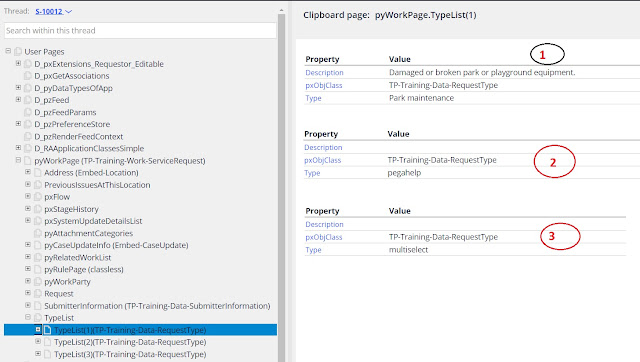
From the above screenshot, we can see that the user has entered free text and made them as options. Pega helps and multi-select options are not there but the user has entered as free text. Whatever input we are trying to type and use in the control other than the existing options from the list, will be considered while running the case but, it will not be saved to the database.
Below is the clipboard structure for free text options selected by the user.
However, we can restrict this free form entry of the text by the user in the control itself.
In the Presentation tab of the control, clear the check box "Allow free-form input".
If we clear the check box, the user can not make a free text into an option at runtime.


Thank you. This is so much helpful.
ReplyDeleteI have a prompt List Property as a Source ( Via Clipboard), while am not getting the results .. Could you please tell us how can I use a prompt List Property as a Source.
ReplyDeleteTo use a Prompt List Property as a source in Pega you need to ensure that you are correctly setting up the Data Pages and ensuring that your Prompt List Property is correctly populated and accessible Below is a general approach for using a Prompt List Property as a source in Pega
Delete1 Ensure Correct Data Type Setup
First verify that the Prompt List Property is defined properly as a List of values This should be done in the property rule itself ensuring that its a Page List or Value List depending on your needs
2 Configure the Source of the Prompt List Property
If you want to populate a Prompt List Property from a Clipboard or an external data source like a Data Page you must ensure that the Prompt List is populated with data before its used You can set this up either by configuring a Data Page to populate the list or by using activities to manually populate the list
For instance you could create a Data Page ReadOnly or Editable to fetch the data and store it in the Prompt List Property on the clipboard The Data Page would be your source in this case
3 Setting the Property Source
In your Prompt List Property when defining the values use the Property Reference for setting it up as a source
Under the Property Reference point to the Data Page or directly to the Clipboard property where the list data is stored
Example If you have a Data Page called D_PromptList you would reference D_PromptList to pull the data into the prompt list
4 Binding the Property to UI Section
When you add this Prompt List Property to a UI such as in a Section make sure that the Control for the property is set to Dropdown or another appropriate control type that can display a list
In the Source of the Dropdown control use the property reference PromptListProperty to bind it to the Prompt List Property from the clipboard
5 Check Clipboard
Ensure that the Prompt List Property is correctly populated in the clipboard You can check the clipboard in the Tracer or Clipboard tool to confirm the data is available before the prompt is invoked
6 Populate the List with Data
If youre not seeing any results check the code that populates the list If youre using a Data Page ensure that the page is being correctly loaded and that the data is valid If youre populating the list through an activity make sure the activity is executing properly and populating the list with the correct values
Example Configuration
1 Data Page Configuration
Create a Data Page that retrieves the data for the prompt list for example a list of cities or departments
2 Prompt List Property Reference
In the Prompt List Property for example pyPromptList configure it to pull data from the Data Page or clipboard property
3 UI Control
In the Section bind the dropdown to the pyPromptList property
By ensuring that the Prompt List Property is correctly configured with valid data and that it is properly referenced in the UI control you should be able to use it as a source for displaying data