
What is Background Processing in Pega?
Executing tasks in the background allows for improved scalability and performance.
We are familiar with using Agents for background processing, such as sending emails, performing tasks on work objects, and queuing items.
Pega provides two rules to support background processing for scenarios that previously required Agents, such as service-level agreements, sending daily emails, or queuing items:

These rules are available in the SysAdmin category in Pega.
How Can They Replace Agents?
Queue Processor
Queue Processor rules replace standard Agents for queue management and asynchronous processing.
We can choose between two types of Queue Processor rules when queuing an item: Standard Queue Processor and Dedicated Queue Processor.
Used for simple queue management.
Used when a Standard Queue Processor is insufficient, such as when deferring a task to a period of low utilization or when additional threads are required to achieve higher throughput.
Job Scheduler
Job Scheduler rules replace advanced Agents for recurring or scheduled tasks, such as sending emails on weekdays.
Job Scheduler rules simplify item scheduling because you configure a single Job Scheduler rule instead of selecting a Standard Agent or Advanced Agent.
Queue Processor: Queue items are then processed by the Queue Processor.
How to Configure a Queue Processor Rule in Pega

1. When to Process
We can configure when the Queue Processor runs from the Processing Nodes Settings section of the Queue Processor rule.
First, we need to decide whether the Queue Processor should run immediately when the object is queued or whether the run should be delayed.
2. Scaling
Scaling determines the number of processing threads allocated to the task and the number of times the system attempts the task.
Vertical scaling: Number of threads.
Horizontal scaling: Number of nodes.
Each thread is assigned on each node of the specified node type.
Node Type
Node type classifies a node based on the type of interaction that the node supports.
For example, we can classify one node as Background Processing to perform background tasks and classify other nodes for user interactions.
When you select the number of threads, this number is multiplied by the number of nodes.
3. Standard or Dedicated Queue Processor
While calling or referring to a Queue Processor rule from other rules, we can choose between Standard or Dedicated Queue Processor. The parameters differ between the two.
Standard Queue Processor: Specify the activity, choose the locking option, and specify the Access Group if required to provide the processing context.
Dedicated Queue Processor: Specify the Queue Processor, choose the locking option, and specify the Access Group if required to provide the processing context.
How to Call a Queue Processor Rule
We can call or refer to a Queue Processor rule in two ways:
1. Activity — Queue-For-Processing Method
From an Activity, we can use the Queue-For-Processing method to queue an item.

2. Run in Background Smart Shape
We can use the Run in Background Smart Shape in a Flow rule. From the Case Designer lifecycle, we can choose it from Automation.

What Happens When Queue Processing Fails?
Queue Processors can fail to process items correctly for several reasons.
The process may be unable to obtain a lock on an entry because it lacks the required security access, or the Activity or related class may be named incorrectly.
If the process fails and the system cannot commit a queue entry, the system puts the entry into a failure status and indicates that the process is broken.
The system also reverses any changes initiated by the process.

How to Monitor Queue Processor Rules
In Pega Admin Studio, we can trace and monitor Queue Processor rules from the Queue Processor landing page.
We can see the number of Queue Processors and broken-item details on the Queue Processor tile.

How to Trace Queue Processor Rules in Pega
From the Admin Studio Queue Processor landing page, we can trace, stop, and start Queue Processors.
We can analyze the tracing results to identify and fix issues with Queue Processor rules.
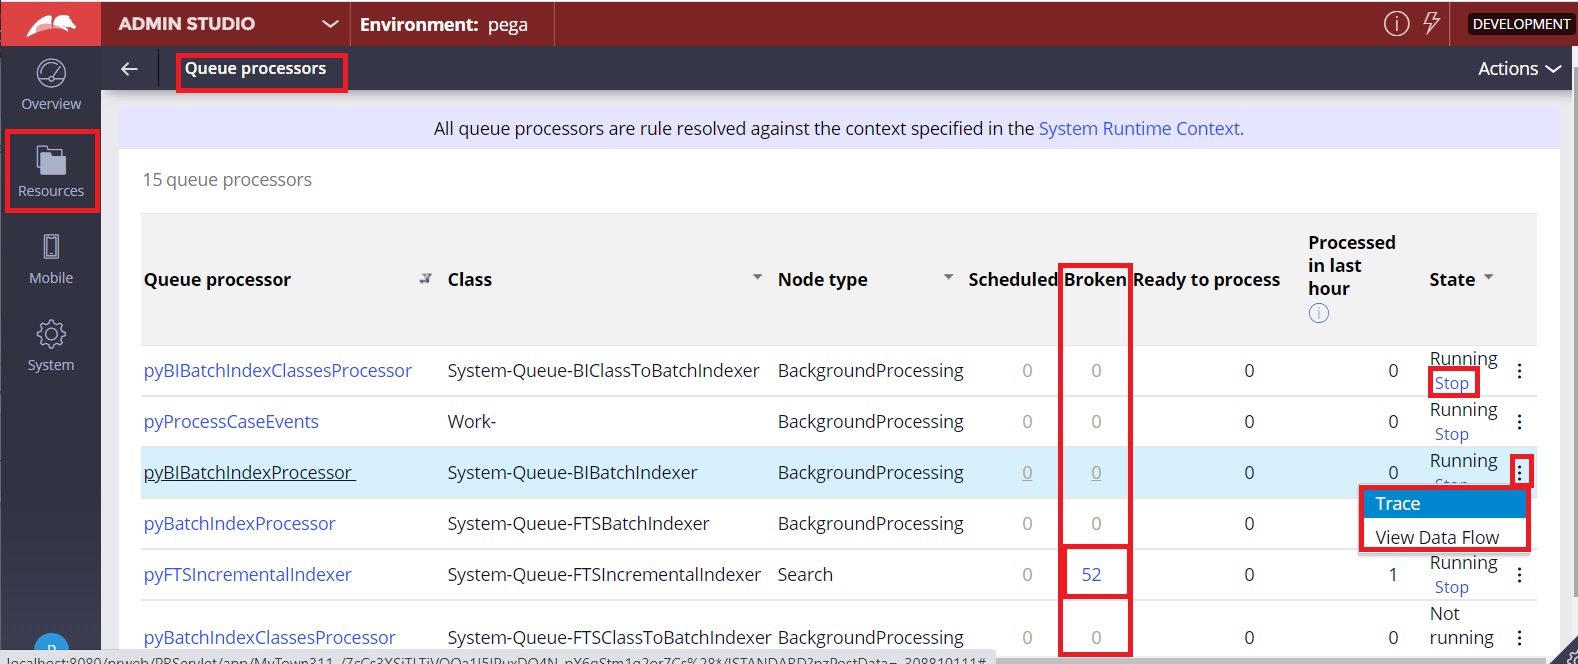
We can also view more data for the Queue Processor by clicking View Data Flow.
We can view run warnings, duration, start time, number of processed records, and average processing time.

How to Configure Job Scheduler in Pega
Job Scheduler rules are used for periodic or recurring tasks. Create a Job Scheduler rule from the SysAdmin category.

How to Manage Job Scheduler in Pega
Job Schedulers can fail to process items correctly for several reasons.
The process may be unable to obtain a lock on an entry because it lacks the required security access, or the Activity or related class may be named incorrectly.
We can manage Job Scheduler rules in Admin Studio, where we can also trace them.

Job Scheduler does not queue items. To troubleshoot issues with Job Scheduler processes, you can run a trace on the failing processes.

Replacing an Agent with a Job Scheduler Rule
We can replace an existing Advanced Agent with a Job Scheduler rule to execute scheduled tasks, such as updating a database of email addresses every day at a specific time.
- Create a Job Scheduler rule to execute a specific Activity.
- Disable the corresponding Agent.
- Click Records > SysAdmin > Agents in Dev Studio.
- Select the Agent.
- Clear the Enabled check box for the Agent that you want to disable.
- Click Save.
Related Article
Thanks for reading this post. Hope it helps. Please share it with others 😀
Usually I never comment on blogs but your article is so convincing that I never stop myself to say something about it. You’re doing a great job Man learn
ReplyDeletePega Online Training
Pega Online Course
Very good content Admin.., Had a gud time reading ur blog
ReplyDeleteVery well explained, Thanks.
ReplyDeleteThank you for sharing.
ReplyDeleteBest SAP Customer Activity Repository Training from Hyderabad
Best Oracle Fusion Manufacturing Training from South Africa
Qlik Sense Certification Training In Singapore
Best Oracle R12 Financials Online Training
SAP UI5 & Fiori Training Course In Hyderabad
Reporting Services SSRS Online Training from USA, Uk, Australia, UAE, Canada
JIRA Administration Online Coaching from Canada
Oracle Fusion HCM Cloud Training from UK
CORE JAVA Certification Training In India
Fusion PPM Online Course from Malaysia
ReplyDelete